Homemade Rocky Road Brownies: Comfort in an Hour (Plus Pro Tips!)
In the realm of comforting desserts, few creations can rival the sheer delight of a perfectly baked brownie. But when you elevate that classic with a symphony of gooey marshmallows, rich chocolate, and crunchy nuts, you transcend into a whole new level of indulgence: the ultimate fudgy rocky road brownies. Imagine a dessert that is not only deeply satisfying and incredibly decadent but also surprisingly simple to whip up, promising pure bliss in around an hour. These homemade rocky road brownies are precisely that – a quick escape to chocolate heaven, making them the ultimate pick-me-up for a long week or a standout treat for any gathering.
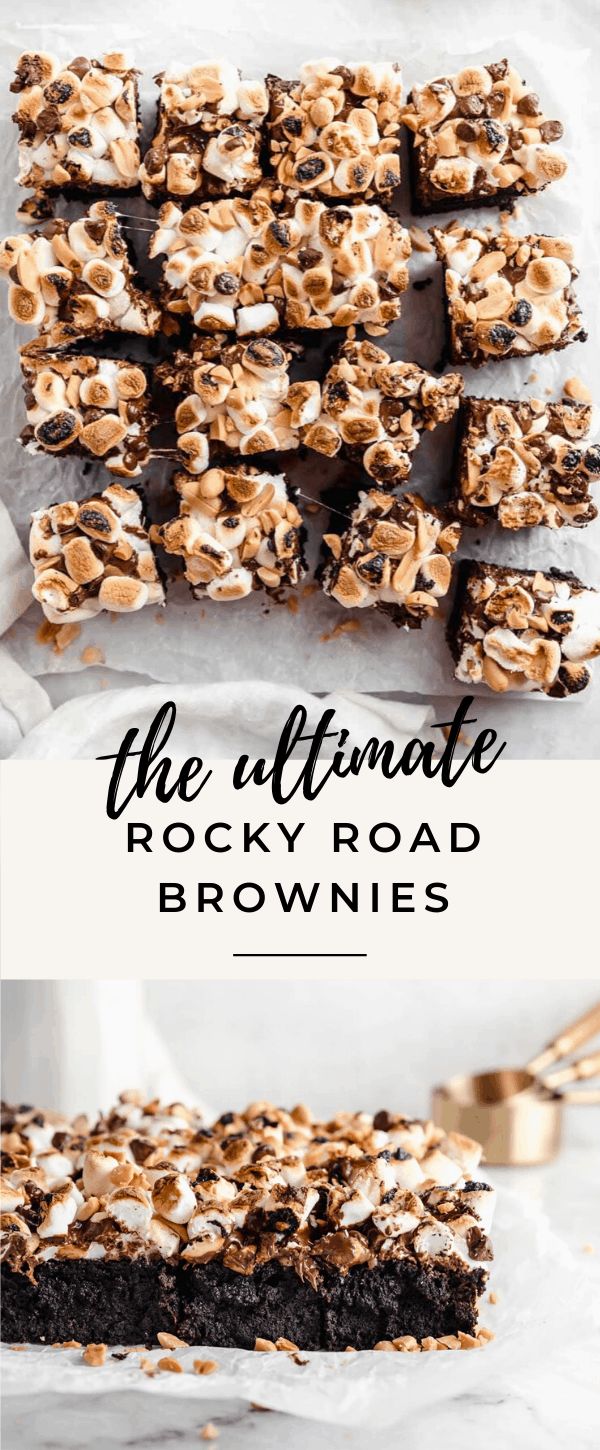
Our journey to brownie perfection begins with a base that is wonderfully fudgy and intensely chocolatey, a canvas for the delightful textures to come. We're talking about a recipe that guarantees a moist, dense brownie with that coveted crackly top, crowned with miniature marshmallows that transform into a soft, melt-in-your-mouth cloud, generously studded with crunchy nuts and extra chocolate chips. It’s a harmonious blend of sweet, rich, soft, and crisp in every single bite. Forget complicated techniques; this recipe focuses on straightforward steps that yield spectacular results, proving that true comfort food doesn't have to be a culinary marathon.
Gather Your Ingredients for Ultimate Rocky Road Brownies
The beauty of these rocky road brownies lies in their simple, accessible ingredient list. Quality ingredients are key to a truly outstanding brownie, so choose wisely!
- Unsalted Butter: ½ cup (1 stick), cut into pieces. Using unsalted butter gives you control over the overall saltiness, ensuring a balanced flavor profile.
- Semisweet Chocolate Chips: 1 bag (12 ounces). We'll divide this – 1 cup for the batter and the rest for topping. Semisweet chocolate strikes the perfect balance, providing deep chocolate flavor without being overly bitter or sweet.
- Granulated Sugar: ½ cup. Contributes to sweetness and that desirable crackly crust.
- Light-Brown Sugar: ½ cup packed. Adds moisture, chewiness, and a subtle molasses note that complements the chocolate beautifully.
- Salt: ½ teaspoon. Essential for enhancing all the other flavors and cutting through the sweetness.
- Large Eggs: 2. Binders that provide structure and richness to your brownies.
- All-Purpose Flour: ¾ cup, spooned and leveled. Spooning and leveling ensures you don't add too much flour, which can lead to dry brownies.
- Miniature Marshmallows: 1 cup. The star of the show, transforming into a gooey, sweet topping.
- Chopped Nuts: ½ cup, such as cashews, pecans, or walnuts. These add a crucial textural contrast and earthy flavor.
Crafting Your Homemade Rocky Road Brownies: A Step-by-Step Guide
Making these homemade rocky road brownies is a delightful process, and with our clear steps, you'll achieve perfection every time.
- Prepare Your Pan & Preheat Oven: Begin by preheating your oven to a cozy 350°F (175°C). Next, lightly butter an 8-inch-square baking pan. The secret to effortless removal and clean slices? Line the pan with parchment paper, leaving a generous overhang on two sides. Butter the parchment as well for extra non-stick insurance. This parchment sling will be your best friend later!
- Melt the Chocolate & Butter: In a heatproof bowl, combine the cut-up butter pieces with 1 cup of your semisweet chocolate chips. Set this bowl over a pot of gently simmering water (ensure the bowl doesn't touch the water). Stir occasionally until the mixture is beautifully melted and smooth, which should take approximately 3 to 5 minutes. This gentle melting method prevents the chocolate from scorching, ensuring a smooth, glossy base.
- Mix the Fudgy Batter: Remove the chocolate mixture from the heat. Stir in both the granulated and light-brown sugars, along with the salt, until well combined. Then, one by one, whisk in the eggs until fully incorporated. Finally, gently fold in the all-purpose flour until just combined. Be careful not to overmix, as this can develop the gluten too much, leading to tougher brownies. A few streaks of flour are perfectly fine.
- First Bake: Spread the luscious brownie batter evenly into your prepared pan. Bake for 30 to 35 minutes. The crucial test here is the toothpick test: insert a toothpick into the center; it should come out with moist, fudgy crumbs attached, not wet batter. If it comes out clean, your brownies might be slightly overbaked, but for rocky road, a little fudginess is always preferred.
- Add Toppings & Final Bake: The magic moment! As soon as the brownies come out of the oven, immediately sprinkle the remaining chocolate chips over the hot surface. Follow this with an even layer of miniature marshmallows and your chosen chopped nuts. Return the pan to the oven for just 5 more minutes. Watch as the chocolate becomes wonderfully shiny and the marshmallows puff up and toast to a gorgeous golden-brown, developing that irresistible gooey top.
- Cool & Slice: This step requires patience, but it's vital for perfect rocky road brownies. Let them cool completely in the pan on a wire rack. The melted marshmallow topping needs time to set properly. Once cool, use the parchment paper overhang to lift the entire slab of brownies out of the pan. Place on a cutting board, and with a large, sharp knife (wiped clean between each cut), slice into 16 squares.
Pro Tips for Perfect Rocky Road Brownies Every Time
Achieving bakery-quality rocky road brownies at home is all about understanding a few key techniques. Here are some insights to elevate your baking:
The Secret to a Gooey Marshmallow Top
The hallmark of a great rocky road brownie is that wonderfully gooey, lightly toasted marshmallow layer. The short, second bake at the end is absolutely critical. This brief exposure to heat perfectly melts the marshmallows, making them soft and stretchy, and gives them a slight golden tint without burning them. It creates that classic, satisfyingly chewy and gooey texture that defines rocky road brownies. Resist the urge to bake them longer than 5 minutes for the final bake; you want puffed, not charred, marshmallows.
How to Tell Your Brownies Are Done (Before Toppings)
The toothpick test is indeed your best friend for the initial bake. Remember, you're looking for moist, fudgy crumbs attached to the toothpick, not a clean stick. A clean toothpick indicates your brownies are likely overbaked and will result in a drier, cake-like texture rather than the desired fudgy interior. If the toothpick comes out with wet batter, they need a few more minutes. Trust your instincts and the visual cues!
Nutty Variations and Beyond
While the recipe suggests classic choices like cashews, pecans, or walnuts, don't hesitate to get creative with your nuts. Chopped almonds or peanuts would be equally delicious. For an extra layer of flavor and crunch, consider toasting your nuts lightly before adding them – this brings out their natural oils and intensifies their taste. Beyond nuts, think about other mix-ins or toppings: mini pretzel pieces for a sweet and salty crunch, a sprinkle of sea salt, or even different types of chocolate chips (milk chocolate, dark chocolate, or white chocolate) for added complexity. A dash of espresso powder (about ½ teaspoon) in the batter can also deepen the chocolate flavor without making the brownies taste like coffee.
Achieving Pristine Brownie Slices
No one wants messy, crumbly brownie squares. The number one rule for clean cuts is complete cooling. The melted marshmallow topping, in particular, needs ample time to set. Rushing this step will result in a sticky, uneven mess. For truly extra-clean squares, after they've cooled to room temperature, you can pop the entire slab into the refrigerator for 20-30 minutes before slicing. Use a large, sharp chef's knife and wipe the blade clean with a damp cloth between each cut. This prevents sticking and ensures every piece looks as good as it tastes.
Serving Suggestions for Your Decadent Rocky Road Brownies
These homemade rocky road brownies are a treat in themselves, but pairing them with a few simple additions can elevate the experience even further. A tall glass of cold milk is the quintessential accompaniment, cutting through the richness perfectly. For an ultimate dessert experience, serve a warm square with a generous scoop of vanilla bean or chocolate ice cream, allowing it to slowly melt into the fudgy goodness. A drizzle of warm caramel sauce or a dollop of fresh whipped cream also makes for a luxurious finish. Don't forget a strong cup of coffee or a gourmet hot chocolate for the perfect cozy pairing.
Storage & Freezing Your Rocky Road Brownies
You've baked a batch of glorious secrets to perfect rocky road brownies: gooey marshmallow & fudgy layers – now, how to keep them fresh?
- Room Temperature: Store your brownies in a single layer in an airtight container at room temperature for up to 3 days. Because the marshmallows can become a bit sticky, placing a sheet of parchment paper between any stacked layers can prevent them from fusing together.
- Freezing: These rocky road brownies freeze exceptionally well, making them perfect for meal prep or unexpected cravings. Once completely cooled, wrap individual squares tightly in plastic wrap, then place them in a freezer-safe bag or container. They can be frozen for up to 3 months. To enjoy, simply thaw them at room temperature for an hour or two, or gently warm them in the microwave for a few seconds for that fresh-baked feel.
Whether you're celebrating a special occasion, need a comforting treat after a long day, or simply want to impress friends and family, these homemade rocky road brownies deliver on every front. Their irresistible combination of fudgy brownie, gooey marshmallow, and crunchy nuts creates a symphony of textures and flavors that truly make them stand out. So go ahead, treat yourself and your loved ones to this delightful creation – comfort is just an hour away!
