Imagine a dessert that stops you mid-bite, forcing you to simply savor the moment. A treat so deeply satisfying, so perfectly balanced in textures and flavors, it transcends mere sweetness. That, my friends, is the magic of homemade rocky road brownies. Forget bland, cakey approximations; we're talking about the ultimate fudgy rocky road brownies – a gooey, chocolatey dream laden with fluffy miniature marshmallows and crunchy nuts, all ready to delight your senses in just about an hour.
This isn't just a recipe; it's a journey to comfort food nirvana. Whether you’re seeking the perfect end to a long week, a show-stopping dessert for a gathering, or simply a moment of pure indulgence, these rocky road brownies consistently hit the spot. They offer a delightful contrast of velvety chocolate, sticky-sweet marshmallow, and earthy nuttiness in every single square. Prepare yourself for a dessert experience that truly makes you appreciate what's happening!
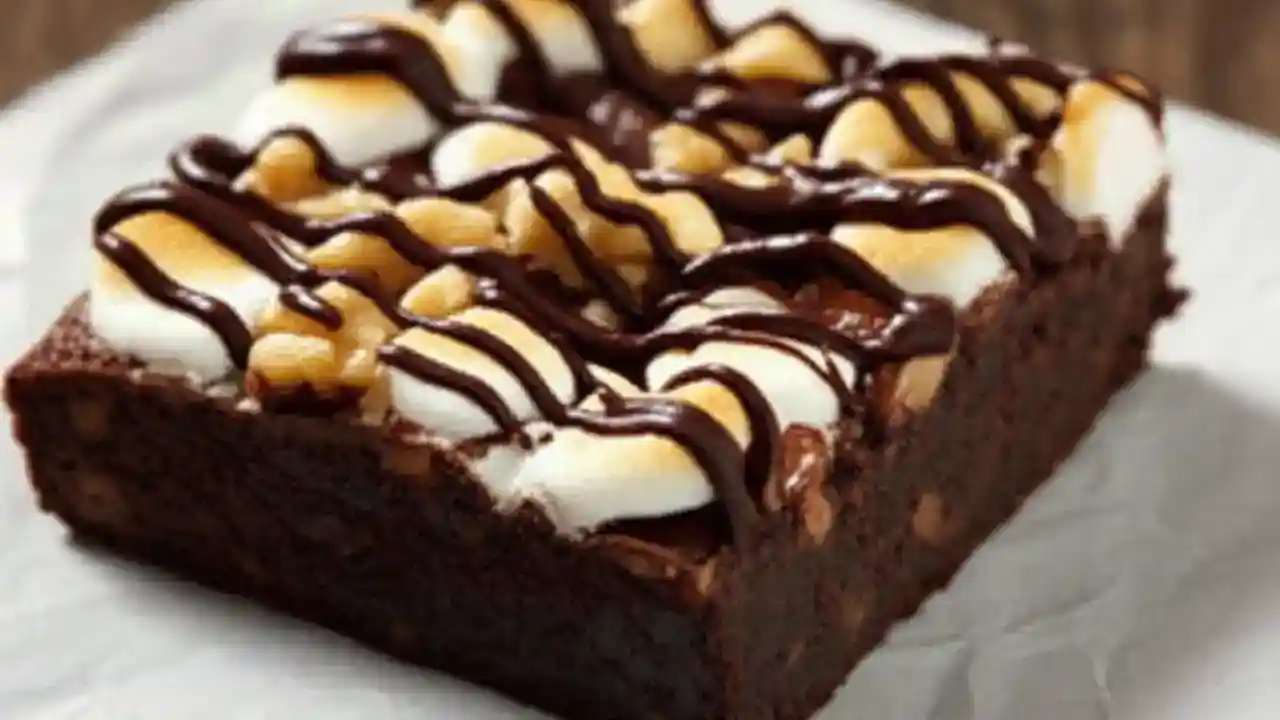
The Irresistible Allure of Ultimate Fudgy Rocky Road Brownies
What makes a rocky road brownie "ultimate"? It's the harmonious marriage of several key elements, each playing a crucial role in creating an unparalleled sensory experience. At its heart lies a rich, deeply fudgy brownie base – not too cakey, but dense and moist, packed with intense chocolate flavor. This is then crowned with a glorious, gooey layer of perfectly melted miniature marshmallows, punctuated by the satisfying crunch of your favorite nuts. Add a scattering of extra chocolate chips, and you have a masterpiece.
This recipe for rocky road brownies prioritizes ease without compromising on flavor or texture. We're breaking down the process to ensure that even novice bakers can achieve bakery-quality results. From melting the chocolate just right to mastering the two-stage bake, every step is designed to deliver maximum deliciousness with minimal fuss. Get ready to impress yourself and everyone lucky enough to share a bite.
Gather Your Ingredients: The Heart of Your Rocky Road Masterpiece
Creating extraordinary brownies begins with understanding the role each ingredient plays. Here’s what you’ll need to assemble for your ultimate fudgy rocky road brownies:
- Unsalted Butter (½ cup / 1 stick, cut into pieces): The foundation of fudginess and richness. Using unsalted butter gives you control over the overall saltiness of the recipe.
- Semisweet Chocolate Chips (1 bag / 12 ounces): The main source of chocolatey goodness. We'll divide these – most for the brownie base, some for the glorious topping. Semisweet provides a balanced chocolate flavor that isn't overly sweet.
- Granulated Sugar (½ cup): Contributes to sweetness and helps create that signature crackly top often associated with excellent brownies.
- Packed Light-Brown Sugar (½ cup): This is key for chewiness and depth of flavor. The molasses in brown sugar adds moisture and a subtle caramel note that complements the chocolate beautifully.
- Salt (½ teaspoon): A non-negotiable ingredient that enhances all the other flavors, particularly the chocolate, and balances the sweetness. Don't skip it!
- Large Eggs (2): Act as a binder, provide structure, and contribute to the rich, dense texture. Ensure they are large for consistent results.
- All-Purpose Flour (¾ cup, spooned and leveled): Just enough to provide structure without making the brownies cakey. Measuring correctly (spooned into the cup, then leveled) prevents too much flour from being incorporated.
- Miniature Marshmallows (1 cup): The "rocky" part of the rocky road! Miniature marshmallows melt more evenly and create a perfect gooey layer across the top.
- Chopped Nuts (½ cup, such as cashews, pecans, or walnuts): Provide essential crunch and a nutty counterpoint to the sweet, soft elements. Pecans and walnuts are classic, but cashews offer a creamier texture. See our tips below for more nut options!
Baking Bliss: Step-by-Step to Perfection
Follow these simple steps to bring your ultimate rocky road brownies to life:
Phase 1: Prep & Melt
Preheat your oven to 350°F (175°C). This ensures even baking from the moment your pan enters the oven. Butter an 8-inch-square baking pan generously, then line it with parchment paper, leaving a helpful overhang on two sides. This overhang acts as a sling, making it incredibly easy to lift the entire slab of brownies out later. Butter the parchment paper too, for extra non-stick insurance.
In a heatproof bowl, combine the cut-up butter and 1 cup of the semisweet chocolate chips. Set this bowl over a pot of simmering water (a classic double-boiler method) – make sure the bottom of the bowl doesn't touch the water. Stir occasionally until the mixture is completely melted and beautifully smooth, which should take about 3 to 5 minutes. This gentle melting prevents the chocolate from scorching, ensuring a smooth, rich base.
Phase 2: Crafting the Fudgy Base
Remove the melted chocolate mixture from the heat. Immediately stir in both the granulated sugar and the light-brown sugar, along with the salt. The residual heat from the chocolate will help the sugars dissolve slightly. Add the two large eggs and stir until they are just combined. Finally, gently fold in the all-purpose flour until it is *just* incorporated. Be careful not to overmix here; overmixing develops gluten, which can lead to a cakey brownie rather than the desired fudgy texture.
Phase 3: The First Bake & The Topping Transformation
Spread the brownie batter evenly into your prepared pan. Bake for 30 to 35 minutes. How do you know when it’s done? The toothpick test is your best friend. Insert a toothpick into the center; it should come out with moist, fudgy crumbs attached, but not wet batter. If it comes out clean, the brownies are slightly overbaked and will be less fudgy.
Once the first bake is complete, remove the brownies from the oven. Don't let them cool! Immediately sprinkle the remaining chocolate chips over the hot brownie surface. The residual heat will start to melt them beautifully. Follow this with an even layer of the miniature marshmallows and your chopped nuts. Return the pan to the oven for about 5 more minutes. This crucial second bake is the secret to gooey, puffed marshmallows and shiny, perfectly melted chocolate. Watch them closely – you want them puffed and lightly toasted, not burnt.
Phase 4: The Art of Cooling & Slicing
This step requires patience, but it’s absolutely essential for perfect results. Let the brownies cool completely in the pan on a wire rack. The melted marshmallow topping needs time to set, and the brownies themselves firm up as they cool, making them much easier to cut cleanly. Once fully cooled (this can take a couple of hours), use the parchment paper overhang to gently lift the entire slab out of the pan. Place it on a cutting board and cut into 16 squares. For extra-clean squares, use a large, sharp knife and wipe the blade clean between each cut, especially after cutting through the sticky marshmallow layer.
Pro Tips for Your Ultimate Rocky Road Brownies
To truly master these rocky road brownies and ensure they're always a showstopper, consider these expert tips:
- Achieving that Gooey Marshmallow Crown: The short, second bake at the end is the absolute key. It perfectly melts the marshmallows, allowing them to puff up and get that classic sticky, slightly toasted rocky road texture without turning into a burnt mess.
- Mastering the Fudgy Brownie Base: Beyond the toothpick test, remember that underbaking brownies by a minute or two is often better than overbaking. A slightly gooier center ensures maximum fudginess. Also, avoid overmixing the flour. For more insights on achieving the perfect texture, check out our article on Secrets to Perfect Rocky Road Brownies: Gooey Marshmallow & Fudgy Layers.
- Nutty Nudges: Customizing Your Crunch: While pecans, walnuts, and cashews are excellent choices, feel free to experiment! Chopped almonds, peanuts, or even a mix of nuts would be delicious. For an extra layer of flavor, lightly toast your nuts in a dry pan for a few minutes before adding them – it really brings out their natural oils and aroma.
- The Secret to Picture-Perfect Slices: Patience truly is a virtue here. Allowing the brownies to cool completely lets the marshmallow set and the chocolate firm up. For incredibly neat squares, some bakers even recommend chilling the brownies in the refrigerator for 30 minutes before slicing, then warming your knife slightly under hot water (and drying it!) between cuts.
- Elevating Flavor with a Pinch of Salt: Consider sprinkling a tiny pinch of flaky sea salt over the brownies immediately after the second bake. The salt crystals provide a delightful textural contrast and an exquisite balance to the sweetness, truly enhancing the chocolate flavor.
- Chocolate Choices: A World of Flavor: While semisweet chocolate chips are standard, feel free to adjust to your preference. Dark chocolate chips will yield a richer, less sweet brownie, while milk chocolate chips will result in a sweeter, creamier profile. High-quality chocolate makes a noticeable difference in the final taste.
Serving Suggestions: Elevate Your Rocky Road Experience
While these rocky road brownies are utterly divine on their own, pairing them with a few simple additions can elevate the experience even further:
- Classic Companions: A tall, frosty glass of cold milk is the quintessential pairing, cutting through the richness perfectly.
- Gourmet Touches: Serve a warm brownie with a generous scoop of vanilla bean or rich chocolate ice cream for a heavenly à la mode experience. The contrast between warm, gooey brownie and cold, melting ice cream is irresistible. A drizzle of warm caramel sauce, chocolate fudge, or even a tangy raspberry coulis can add a sophisticated finish.
- Unexpected Delights: For an adult treat, pair a square with a small espresso or a robust cup of coffee. The bitterness of the coffee beautifully complements the sweetness of the brownie.
Storing Your Rocky Road Treasures
If you manage to have any leftovers (a rare occurrence!), here’s how to keep your rocky road brownies fresh:
- Room Temperature: Store the brownies in a single layer in an airtight container at room temperature for up to 3 days. The marshmallows can become a bit sticky, so placing parchment paper between layers can help prevent them from sticking together.
- Freezing for Future Cravings: These brownies freeze exceptionally well. Wrap individual squares tightly in plastic wrap, then place them in an airtight freezer-safe container or bag. They'll keep in the freezer for up to 3 months. Thaw at room temperature for an hour or two, or gently warm in the microwave for a few seconds for that fresh-baked gooeyness.
The ultimate fudgy rocky road brownie is more than just a dessert; it’s a celebration of texture, flavor, and pure comfort. With this easy recipe and our comprehensive tips, you’re now equipped to create a batch of brownies that will be remembered long after the last crumb is gone. So preheat your oven, gather your ingredients, and get ready to bake some magic. Happy baking!
